Developing C for Linux on Windows

Getting started with C on Windows can be done easily by downloading Visual Studio, especialy if you are targetting Windows itself. When targeting Linux it’s of course best to get an actual linux os to get started. Both WSL and Hyper-V makes it easy to create and run an actual Linux distro on Windows, however if all you want to do is write some code this can be quite the overhead. A recent option I’ve been looking into is using devcontainers in VS Code.

Clone the final repo from my github.

Getting started

Create a folder and init a new git repo, start VS code

mkdir c-in-devcontainer
cd .\c-in-devcontainer
git init
code .

If not installed press Ctrl + Shift + x to go to the extensions tab and install the Remote Development extension (id ms-vscode-remote.vscode-remote-extensionpack). Open the command palette by pressing Ctrl + Shift + p. Begin to type Add Dev Container Configuration Files… and pick it when the option appears.

Pick Add configuration to workspace and then C++. I’m gonna pick the default for the rest of the options and not install any aditional packages. VS Code has now created a folder .devcontainer with a devcontainer.json file and a Dockerfile. Open the devcontainer.json file and add the following to the json object:

...
"runArgs": [ "--name", "c-in-devcontainer"]
...

Open the command palette by pressing Ctrl + Shift + p and pick Rebuild and Reopen in Container. VS Code will build the Dockerfile, start a container and reopen with the folder inside the folder. How cool right? 😎

Life inside a devcontainer

Notice in the bottom left corner:

VS Code is currently opened inside our running docker container. Opening a terminal and typing gcc --version will display information about gcc wich is already installed inside the container.

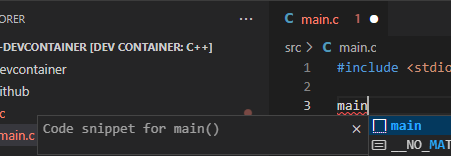
And if you create src/main.c and begin writing code you will even get syntax highlighting and intelisense:

Go to the extensions tab and see that there are extensions listed for the devcontainer.

For anyone cloning your repo, setting up a development environment requires no installation and no modification to VS Code and ensures everyone can have the same development experience (given they have VS Code and docker installed).

Let’s write some code

Create a Makefile in the root and add a simple default target:

build:
    gcc src/main.c -o c-in-devcontainer

Alter our file src/main.c:

#include <stdio.h>

int main(int argc, char const *argv[])
{
printf("Hello world!\n");
return 0;
}

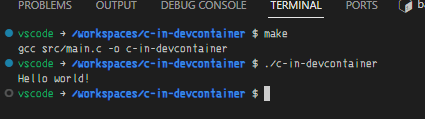
Run make in the terminal to compile the project and then try out our new masterpiece:

Let’s read some user input!

// main.c
#include <stdio.h>

int main(int argc, char const *argv[])
{
char name[50];
printf("Hello, what's your name?\n");
scanf("%s", name);
printf("Hello %s\n", name);
return 0;
}

Compile and run again

I’m gonna add a .gitignore and refine the make file a bit, clone it from github to get started!

Uploading files to ASP.NET Core

During a project I needed to make the user upload a csv-file to a controller, process it and store the result in a database.

The upload form

A simple html-form object is enough to be able to upload a file to a controller. asp-controller and asp-action tag helpers makes it easy to point the form to the right controller/action. The accept=".csv" parameter lets us specify file formats the user can pick from. To be able to upload files the form needs to encode the data with the enctype="multipart/form-data".

Of course, if you want more control over the upload you can write javascript code and make an Ajax-request.

    <form method="post" asp-controller="FileUpload" asp-action="UploadCsv" 
          enctype="multipart/form-data">
        <div class="custom-file">
            <input class="custom-file-input"
                   type="file"
                   id="Files"
                   name="FormFile"
                   accept=".csv"
                   aria-describedby="inputGroupFileAddon01" />
            <label class="custom-file-label" for="inputGroupFile01">Choose file</label>
        </div>
        <div class="form-group my-2">
            <input type="submit" lang="en" class="float-right btn btn-primary" />
        </div>
    </form>

Create a controller to handle the upload

A simple controller was created to handle the uploaded file. The file is buffered into the applications memory in the form of an IFormFile. The nameof the file in the form must match the name of the IFormFile in the controller. Let’s try it out!

[HttpPost("/FileUpload")]
public ActionResult UploadCsv(IFormFile FormFile)
{
    return LocalRedirect("/");
}
The controller bind the object to the file.

Parse the file

Let’s add a way to parse the csv-file, add the package CsvHelper from NuGet:

PM> Install-Package CsvHelper

To parse the file we also need to create a class to bind the file to. The base file contains crimes reported per 100 000 population for different regions in Sweden during the last four years. It looks like this:

År;Nord;Mitt;Stockholm;Öst;Väst;Syd;Bergslagen
2015;8449;10521;18042;10395;12493;12410;10297
2016;8419;10293;18106;10438;11957;12369;10393
2017;8746;10142;16590;10463;11919;12576;10555
2018;8725;10387;16927;10507;11424;12727;10912

So a class is created to match the structure:

public class CrimeRate
    {
        public int Ã…r { get; set; }
        public int Nord {get;set;}
        public int Mitt { get; set; }
        public int Stockholm { get; set; }
        public int Öst { get; set; }
        public int Väst { get; set; }
        public int Syd { get; set; }
        public int Bergslagen { get; set; }
    }

Read the uploaded file

Csv-helper reads from a class that implements the abstract class TextReader, so we can create a StreamReader . The bytestream is passed from the uploaded file by invoking the OpenReadStream() method on the FormFileobject:

[HttpPost("/FileUpload")]
public ActionResult UploadCsv(IFormFile FormFile)
{
    using (var StreamReader = new StreamReader(FormFile.OpenReadStream()))
    {
     ...

When we have the StreamReader we can pass it to a CsvReader that reads the rows via the GetRecords<T>() method. The complete code for the controller looks like this:

[HttpPost("/FileUpload")]
public ActionResult UploadCsv(IFormFile FormFile)
{
    using (var StreamReader = new StreamReader(FormFile.OpenReadStream()))
    {
        using (var csv = new CsvReader(StreamReader))
        {
            var Records = csv.GetRecords<CrimeRate>().ToList();
        }
    }
    return LocalRedirect("/");
}
The file is now a List<T>

Handling the file

In this case the whole file is read and will be processed to store the content in a database after validation has been done. There are of course other scenarios to handling a file, for example writing to a network location or disk.

When dealing with unknown files security is of course a major concern. This is covered in the MVC-documentation. Read it carefully!

C# basics: Delegates

Delegates are a way to declare accepted properties and returntype of methods, without having to write the actual code for the method. This can be handy when the method of an object depends upon the actual object itself.

When writing methods you define returntype, parameters and the actual code to be performed, the function body.

But in some cases when the method should depend on the instance of the class, it can be a problem to specify the actual function body.

Imagine we have a class Person with the string properties FirstName, LastName, and a List<string> property NameHistory for which we instantiate two objects: NoBody and SomeBody. We would like to be able to change the name of the people so we write a method ChangeName for this, but can’t decide how to write the code to save the history of names. Datastorage is precious and there are lots of nobodies in the world, so we can’t keep track of their names in a NameHistory. But we should keep a detailed record of this for a person that’s a somebody.

class Person
{
    public string FirstName { get; set; }
    public string LastName { get; set; }
    public List<String> NameHistory { get; set; }

    public void ChangeName(string NewFirstName, string NewLastName)
    {
        ...?
    }
}

Person Nobody = new Person { FirstName = "No", LastName = "Body" };
Person SomeBody = new Person { FirstName = "Some", LastName = "Body" };

Of course an easy way would be to implement a property bool IsSomebody and use an if-statement in the ChangeName function. But what if we end up having lots of different rules for different instances of person? A delegate would solve this problem.

Create a delegate

A delegate is created with the keyword delegate followed by it’s returntype and parameters. You can then create an instance of this delegate, load it up with a method and invoke the method by calling the instance of the delegate.

class Person
{
    ...
    //Defenition of a delegate that returns nothing and takes a Person object as a parameter
    delegate void StoreHistoryDelegate(Person p);
    //A default method is given that takes itself as a parameter and does nothing. Using a lambda-expression to define the 
    //method.
    public StoreHistoryDelegate StoreHistory = p => {};

    public void ChangeName(string NewFirstName, string NewLastName)
    {
        //The delegate is used in the method to store history of name
        StoreHistory(this);
        //The names are changed
        this.FirstName = NewFirstName;
        this.LastName = NewLastName;
    }
    ...
}

We can then override the method contained in the instance of the object if we want to, and define a new function to handle the history storing.

Person Somebody = new Person { FirstName = "Some", LastName = "Body" }
Somebody.StoreHistory = (Person p) => 
{
    //Add datetime and previous name to the history list
    p.NameHistory.Add($"{DateTime.Now}: previous name is {FirstName} {LastName}");
}

C# basics: $pecial Ch@racters

String interpolation – $

Definition of interpolate: transitive verb

  • 1a: to alter or corrupt (something, such as a text) by inserting new or foreign matter
  • b: to insert (words) into a text or into a conversation

Source: Merriam-webster

When you want to insert code expressions in a string, using a string interpolation with the $ character in front of the string is the easiest and most readable way.

Console.WriteLine($"Car with ID {Car.CarID} costs {Car.Price}.")

Verbatim identifier – @

Definition of verbatim:

In the exact words : word for wordquoted the speech verbatim

Source: Merriam-webster

The C# compiler translates some special characters in a string. For example, when writing a filepath:

//Will not compile
Console.WriteLine("C:\Program Files\Documents\");

//Compiles
Console.WriteLine("C:\\Program Files\\Documents\\");

The \ is interpreted as an escape character, for the character after it, instead of just a \ character. Especially for filepaths it’s very handy to just be able to write the path, so here you can use the verbatim identifier @ and the compiler will interpret the string verbatim, “literally”.

Console.WriteLine(@"C:\Program Files\Documents\");

C# basics: foreach loops

foreach loops are used to loop through collections of objects. C# has many standard type of loop functions, but the foreach loop is a special case. It can however be broken down to basic components to understand how it works. Imagine you have an array of cars that you iterate with a foreach loop:

//The car class
class Car{
  public int CarID {get;set;}
  public string Model {get;set;}
}

//Create an array of cars
public Car[] Cars = new Car[] {
  new Car { CarID = 1, Model = "Volvo"},
  new Car { CarID = 2, Model = "Mercedes"}
}

//Loop through the array
foreach(var Car in Cars)
{
  Console.WriteLine($"Car with ID {Car.CarID} is a {Car.Model}.");
}

// Car with ID 1 is a Volvo
// Car with ID 2 is a Mercedes

You get the Car objects one at a time, but under the hood more things are happening. The code invokes the method GetEnumerator() on the array which returns an object designed to iterate collections, let’s call it enum. This object must have a property named Current indicating the current object, and a method bool MoveNext(). The foreach loop could instead be written like this:

var enum = Cars.GetEnumerator();

while(enum.MoveNext())
{
  Var Car = enum.Current();

  // Start of code inside foreach block
  Console.WriteLine($"Car with ID {Car.CarID} is a {Car.Model}.");
}

Implementation

You can implement this functionality in your own class as well. Although the foreach loop doesn’t require any special function of the method MoveNext() and property Current of the object returned by GetEnumerator(), the most common case is to loop through each item and return false when the end is reached, keeping track of items with an index.

class CarEnumerator
{
  //MoveNext is invoked at the start of the loop, so begin the index at -1 to start at 0
  private int index = -1;
  private readonly Car[] Cars;

  //The Cars array is given during construction
  public CarEnumerator(Car[] Cars)
  {
    this.Cars = Cars;
  }

  //Move next advances the index by one and returns true if the end of the collection is not reached
  //When index >= Cars.Length it will return false, and the while-loop will not continue
  public bool MoveNext()
  {
    index ++;
    return (index < Cars.Length)
  }

  //The get method of the Current property returns the object at the current index position
  public Car Current
  {
    get{
      return Cars[index]
    }
  }
}

The actual method GetEnumerator() resides in a separate class, which also holds the collection.

class CarList
{
  Car[] Cars;

  public CarList(Car[] Cars)
  {
    this.Cars = Cars;
  }

  public CarEnumerator GetEnumerator()
  {
    return new CarEnumerator(Cars);
  }
}

In practice

This was a brief overview of how the foreach loop works. In practice you should implement the interface IEnumerable and IEnumerator when creating custom implementations for your class.

Design a site like this with WordPress.com
Get started